• Skip to primary navigation
  • Skip to main content
  • Skip to primary sidebar
amberitas kitchen
  • recipes
    • sandwiches
    • sauces
    • lunch
    • dinner
    • mexican
    • pasta
    • potato
    • dessert
    • veganuary
  • English
    • Español
    • Nederlands
    • English
  • contact
  • about me
  • privacy policy
  • Navigation Menu: Social Icons

Tofu Bowl with Sesame Vinaigrette

20/01/2021 by Amber Leave a Comment

This tofu bowl with sesame vinaigrette is a lovely, filling dish. Read on for the recipe!

two tofu bowls with sesame vinaigrette seen from above with spring onion, avocado, tofu in a skillet against a dark background

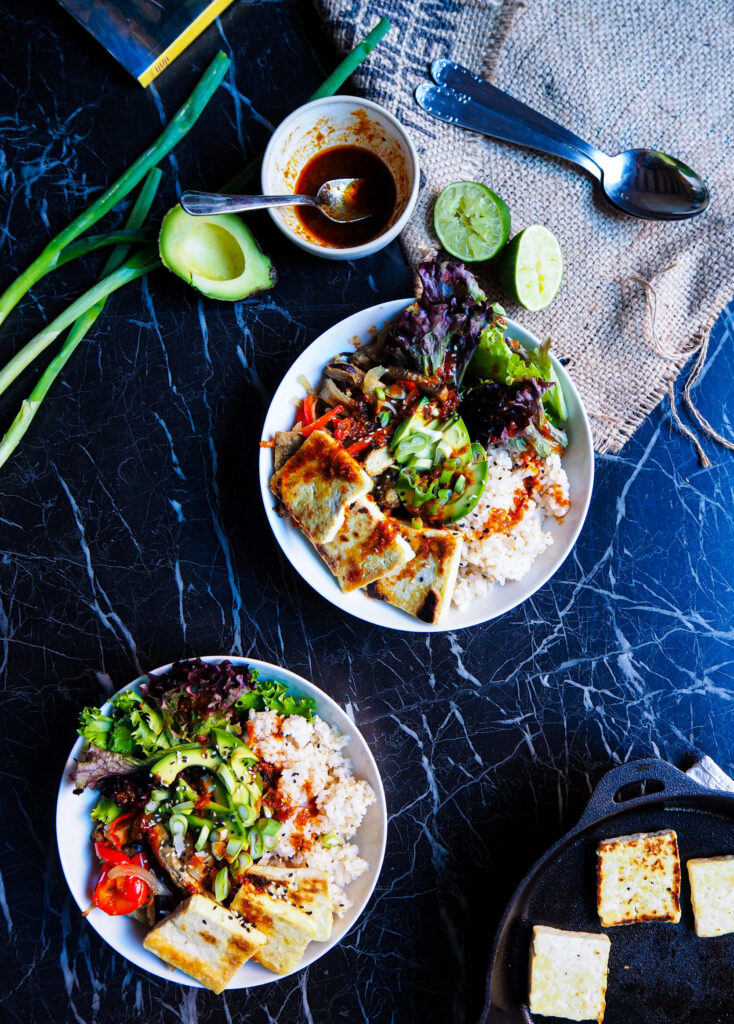
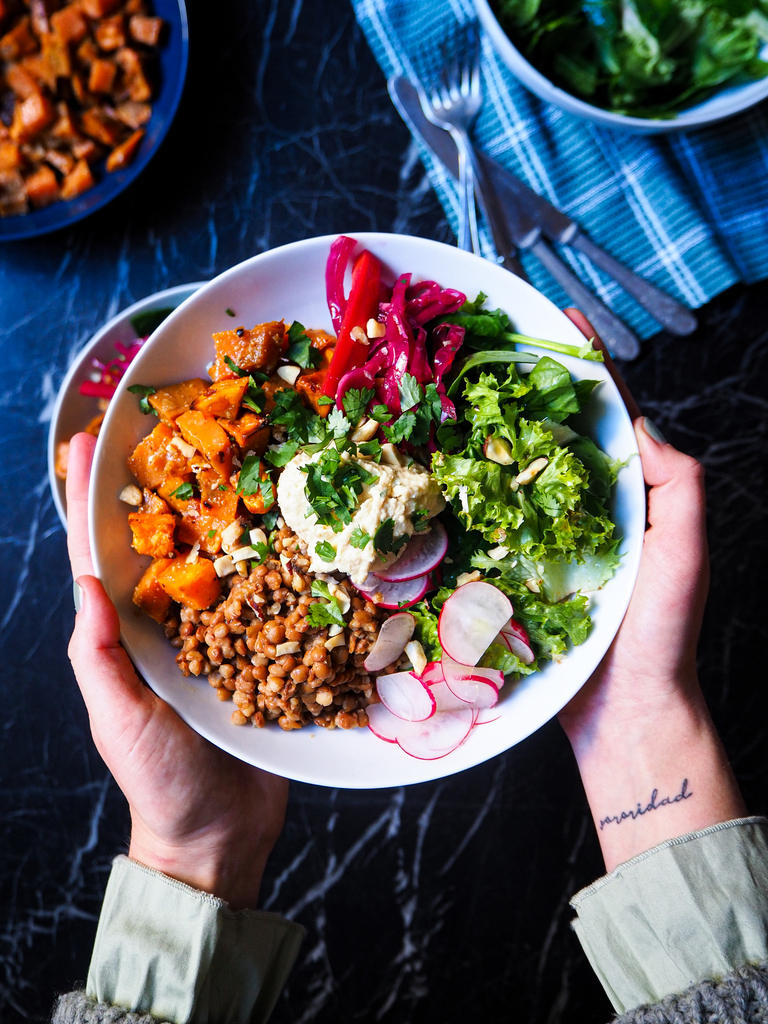
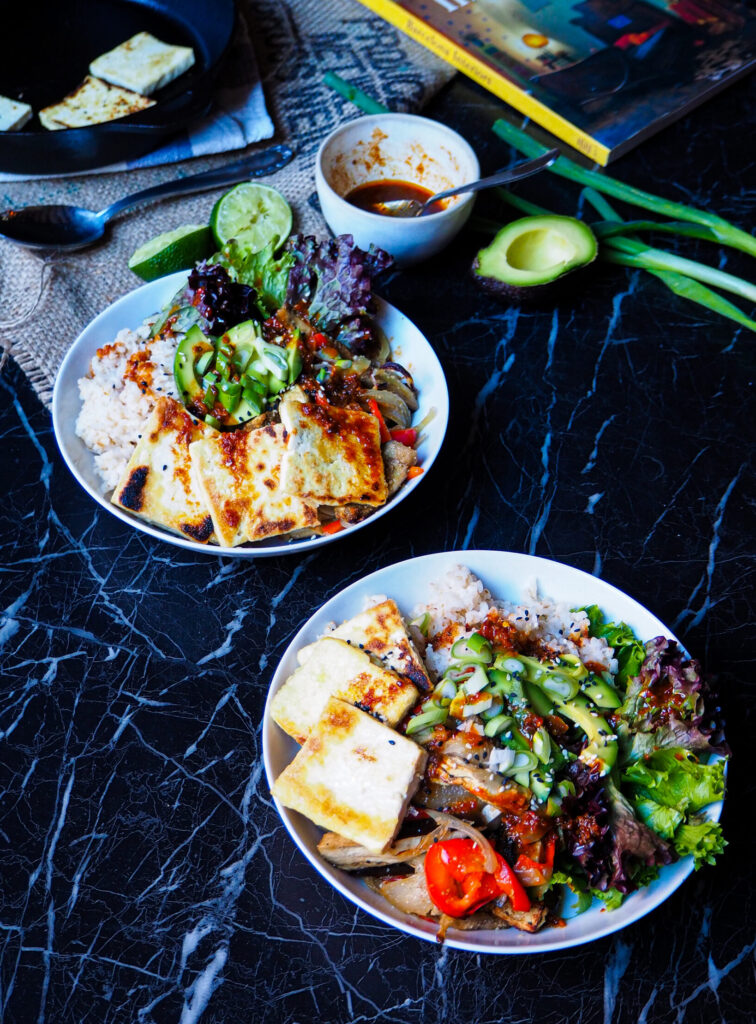
Tofu bowl with all the toppings.

Tofu Bowl & Sesame Vinaigrette

This tofu bowl is filled with delicious goodness. Rice, mixed greens, avocado, and roasted vegetables! It’s easy to put together too, once you pop the veggies in the oven you can move onto the other ingredients. As for the rice, you can choose whatever you rice you fancy. I like serving this with brown rice, the nutty flavour goes well with the sesame oil.

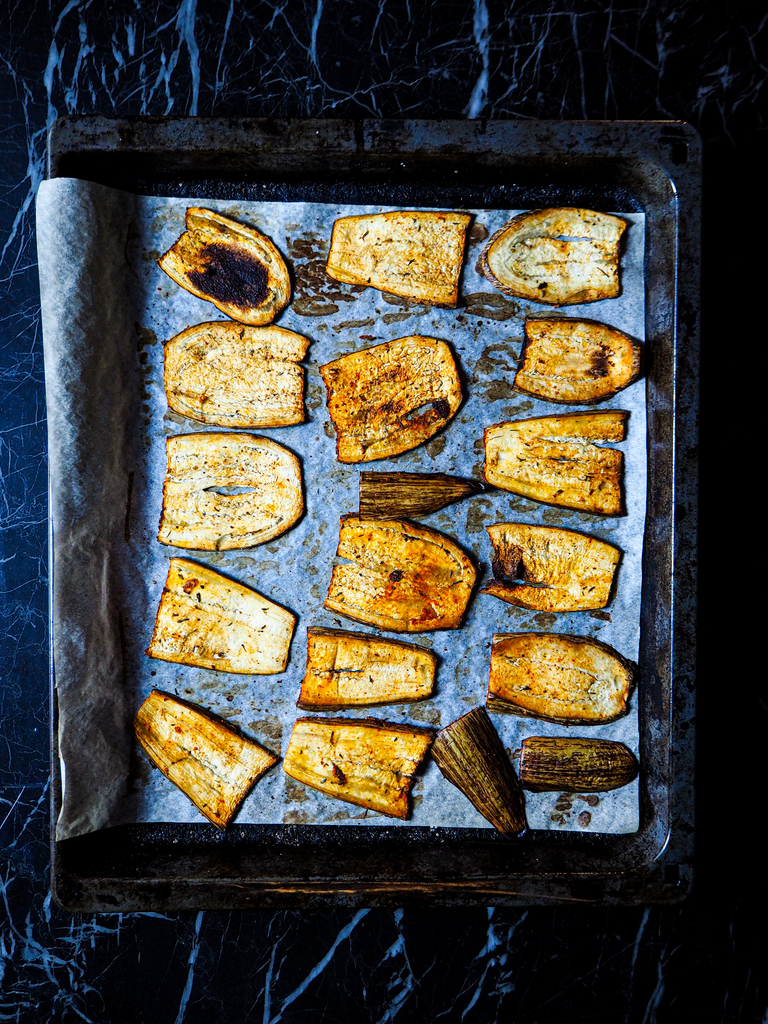
As for the vegetables, it’s a simple combination of aubergine, red pepper, onion, mushrooms. A couple of herbs and spices and in to the oven they go!

When it comes to rice I’ve said it before and I’ll say it again. Wash your rice and use an appropriate amount of water. No pouring out the water after cooking. It’ll leave you with delicious, fluffy rice. Plus, when you add a few nice flavours to the cooking water, they’re actually absorbed by the rice. I like adding a bay leaf and some oil.

a tofu bowl with sesame vinaigrette seen up close help up by two of my hands

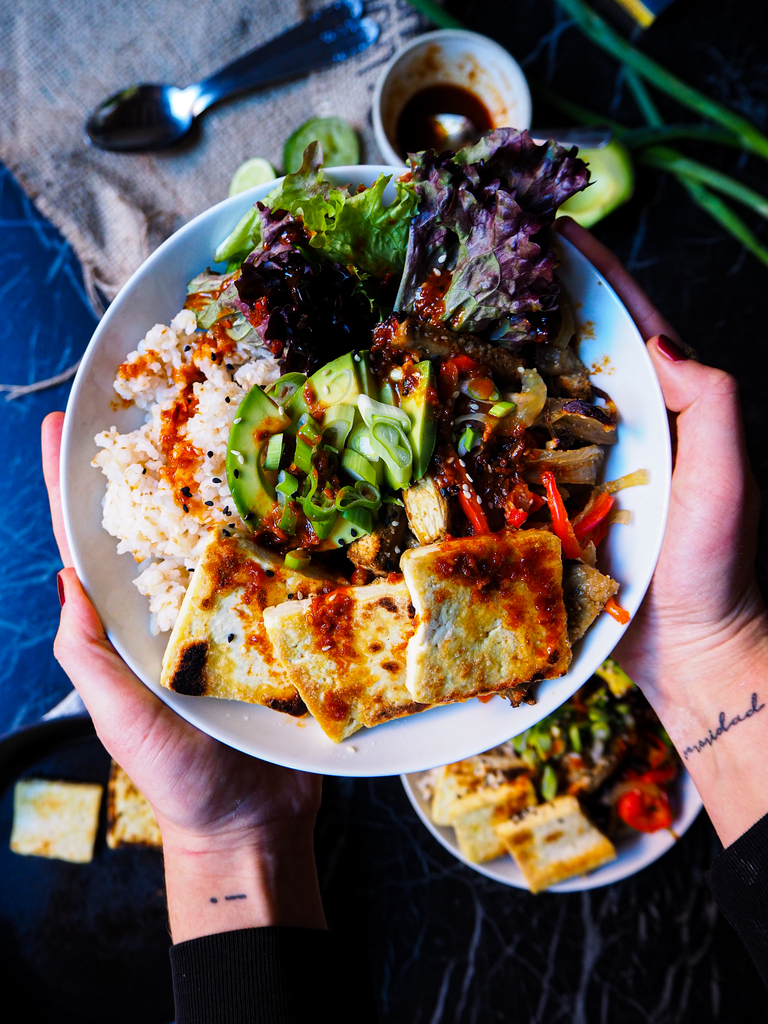
Look at all that goodness. Yum.

Sesame Vinaigrette

At first I wasn’t sure if I was allowed to call this a vinaigrette. But, turns out I can. Since a vinaigrette is mixing oil with something acidic. So, sesame vinaigrette it is!

The ingredients for this vinaigrette might not be stuff you have in the cupboard. If you can, I’d say go and buy them from the Asian supermarket. Seriously delicious stuff. If you don’t want to spend much or cannot be bothered to go to the shop, you can use a few subs. It’s not going to taste exactly the same but similar. For the soy bean paste you can sub miso paste. For the ponzu (citrus soy sauce) you can use regular soy sauce and some lemon juice.

two tofu bowls with sesame vinaigrette seen from a front view with half an avocado, a halved lime, spring onion, a skillet with tofu, and a book in the background

Lets get to cooking!

I hope you enjoy this recipe! Be sure to tag me in any pictures or use #ohsoplantiful on Instagram or Facebook.

Happy eating.

Looking for more delicious recipes? How about this quinoa bowl with miso glazed sweet potato?

a tofu bowl with sesame vinaigrette seen up close help up by two of my hands

Tofu Bowl with Sesame Vinaigrette

A delicious bowl with crispy seared tofu, brown rice, roasted veggies, and a slightly spicy sesame vinaigrette.
Print Recipe Pin Recipe
Prep Time 5 minutes mins
Cook Time 40 minutes mins
Servings: 4 servings
Course: Dinner, Lunch
Cuisine: Asian
Ingredients Equipment Method Notes

Ingredients
  

Roasted Veggies
  • 1 aubergine
  • 1 red pepper
  • 4 large mushrooms use 8 small ones if you have those.
  • 1 onion
  • 2 cloves of garlic
  • 1 tsp onion powder
  • 1 tsp garlic powder
  • ½ tsp cumin
  • ½ tsp coriander
  • ½ tsp salt
  • cracked black pepper
  • 1 tbsp olive oil
Vinaigrette
  • 1 tsp korean soy bean paste sub miso
  • 1 tsp ponzu sub soy sauce and lemon juice
  • 3 tbsp sesame oil
  • ½ tsp chili flakes
  • 1 lime
  • 1 knob of ginger, 2 cmx2cm-ish, grated
Other
  • 300 grams rice 1 large cup
  • 1 ½ - 2 x the amount of water to rice ratio
  • 1 pinch of salt
  • 1 bay leaf
  • 300 grams tofu
  • 1 tbsp potato starch
  • 1 tbsp olive oil
  • 1 avocado
  • 4 handfuls mixed greens
  • 1 spring onion
  • 2 tbsp sesame seeds

Equipment

  • oven
  • Skillet

Method
 

  1. preheat the oven to 180 °C , 350 °F.
  2. cut all the vegetables and place in a bowl. add the spices and olive oil, mix well, and place on a lined baking sheet.
  3. place in the oven for 40 minutes or until golden brown and tender.
  4. wash your rice and cook according to instructions.
  5. coat the tofu in potato starch. sear on both sides in a hot skillet. add a sprinkle of salt.
  6. for the vinaigrette, mix all the ingredients well.
  7. in a bowl, combine the rice, greens, vegetables, tofu, avocado, spring onion, and top with the vinaigrette and sesame seeds.

Notes

This recipe is gluten free! 
Keeps in the fridge for several days. 
Tried this recipe?Let us know how it was!


Filed Under: dinner, lunch, recipes, veganuary

Vegan Tofu & Shiitake Gyros

19/01/2021 by Amber 1 Comment

These vegan tofu & shiitake gyros are a fabulous weeknight meal. Read on for the recipe!

three flatbreads with gyros seen from a front view on a serving board with salad in the background

Vegan gyros made with tofu and shiitakes.

Tofu and Shiitake Gyros

For this vegan version we’ll be using both tofu and dried shiitakes. You could use another type of mushroom if you wish. I find the combination of these two particularly delicious. The tofu adds the body and some texture, the shiitakes add a meatiness in both flavour and texture.

I’m glad I can type out this recipe and thereby avoid having to pronounce ‘gyros’. Because I’m sure every single one of my friends from Greece would laugh in my face. Luckily, it seems I’m not the only one who struggles with this.

pan with tofu and shiitake gyros seen from above with wooden spoon

A meaty combination: tofu and shiitakes.

A very important part of the flavours in the gyros comes from the marinade. A tangy, very herby one. Lemon juice, olive oil, lots of oregano.

Tzatziki

The base for this vegan tzatziki is cashews. They are just the best way to get a creamy, rich consistency. To that base we’ll be adding lemon juice for tang. Lots of dill and garlic. And cucumber. Ah I just love tzatziki. I’ve made it so you’ll have leftover if you don’t eat all of it in one sitting! The garlicky, fresh taste goes so nicely with the gyros.

The toppings for gyros are entirely up to you. I’ve added my toppings of choice to the ingredients. I like keeping it fairly simple with a bit of tomato, red onion, maybe some more cucumber, some lettuce. A bit more of the fresh dill. I would have also added some kalamata olives if I had any. Basically, the ingredients that go in a choriatiki. (A very simple Greek salad).

a tofu and shiitake gyro seen up close

This vegan version is legit.

Make these vegan tofu & shiitake gyros today! And be sure to tag me in any photos on Instagram, I love to see it!

In the mood for some more bread based meals? Check out my falafel recipe.

three vegan tofu and shiitake gyros seen from above with a hand grabbing one.

Vegan Tofu & Shiitake Gyros

A delicious vegan version of the Greek classic: gyros. Made with tofu and dried shiitake, plus a homemade vegan tzatziki to add!
Print Recipe Pin Recipe
Prep Time 5 minutes mins
Cook Time 20 minutes mins
Total Time 25 minutes mins
Servings: 4 servings
Course: Dinner, Lunch
Cuisine: Greek
Ingredients Equipment Method

Ingredients
  

Gyros
  • 1 tbsp olive oil
  • 1 onion, diced
  • 250 grams tofu
  • 6 dried and rehydrated shiitakes
  • 1 tsp chicken seasoning optional
Marinade
  • ½ lemon
  • 2 tbsp olive oil
  • 4 tbsp plantbased milk alternative i used oat milk
  • 3 tbsp dried oregano
  • 2 cloves of garlic, minced
  • black pepper
  • ½ tsp salt
Tzatziki
  • 200 grams soaked cashews (1 ¼ cup)
  • ⅓ cup water
  • pinch of salt
  • ½ lemon
  • 2 cloves of garlic
  • 1 cucumber
  • 1 handful of dill
Toppings
  • 1 tomato, cubed
  • ½ red onion, minced
  • 1 handful of lettuce

Equipment

  • Pan
  • Blender

Method
 

Tzatziki
  1. Let's start with the tzatziki, I like making it and placing it in the fridge whilst I make the rest.
  2. Blend all the ingredients except for the cucumber until smooth. The cucumber is peeled, the soft insides taken off and then grated coarsely or chopped fine.
  3. Once smooth, add in the cucumber and sprinkle a bit more dill on, and salt to taste.
Gyros
  1. First, make the marinade by putting all the ingredients together in a bowl and mixing well.
  2. Then, roughly slice the tofu to replicate the look of rotisserie meat. Cut the rehydrated shiitakes and onion.
  3. Get a pan hot on a medium high heat. Add the olive oil. Sauté the onion, then add the tofu and get some colour on it. Add the shiitakes. Sauté a few minutes and add the marinade. Cook for a minute or two.
  4. Get your flatbread ready, add a generous helping of tzatziki, lettuce, the gyros, and toppings of your choice. I like adding some fresh tomato and cucumber. Some kalamata olives also go nicely.
  5. Enjoy!
Tried this recipe?Let us know how it was!


Easy Quick Flatbreads

A very easy recipe to whip up some quick homemade flatbreads. It doesn't get easier than this!
Print Recipe
Prep Time 5 minutes mins
Cook Time 10 minutes mins
resting time 30 minutes mins
Total Time 45 minutes mins
Servings: 8 breads
Course: Appetizer, Dinner, Lunch, Side Dish
Ingredients Equipment Method Notes

Ingredients
  

  • 500 grams flour
  • 10 grams salt
  • 300 grams water

Equipment

  • Pan

Method
 

  1. In a bowl, first combine the flour and salt.
  2. Add in the water, stir and mix until it starts coming together.
  3. Knead for about 5 minutes until the dough feels smooth.
  4. Let the dough rest covered with foil or a damp towel.
  5. Divide the dough in 6 or 8 small balls. On a floured work surface, roll out the balls.
  6. In a dry pan on a high heat, cook the flatbreads one by one. They should be done in 30 seconds to a minute per side, depending on how thick they are. Don't be afraid to char them on each side.
  7. Enjoy!

Notes

These do not puff up or rise, so make sure you roll these out. If they're very thick, they're going to be quite dense. 
Tried this recipe?Let us know how it was!

Filed Under: bread, dinner, dips, lunch, recipes, sandwiches, veganuary

Vegan Garlic Tear and Share Bread

14/01/2021 by Amber 3 Comments

This vegan garlic tear and share bread is wonderful to share with others (or not). Hehe.

vegan garlic share and tear bread seen from above on an oven rack

Get it while its hot

Bread baking basics

Baking a bread with conventional yeast (be it fresh or dry) is actually really quite simple. Yes, you need to get your hands a bit dirty. Yes, you need to wait a bit. But all in all, a freshly baked loaf that YOU made is so satisfying. And you’ll feel so proud. The process is mostly passive. Just a bit of waiting and bingo bango bread!

Let’s start with the basics: flour, salt, water, yeast. For this bread you can use bread flour or all purpose flour. Bread flour is just flour with a higher percentage of protein. Because breads with conventional yeast (as opposed to sourdough) take a short amount of time to rise, all purpose flour is fine. The higher protein is necessary for sourdoughs as they rise of long periods of time and the proteins help the dough keep its shape and strength. So, long story short, any flour will do here.

Next up: rising. Rising is a very important step for bread. It develops air pockets, which in turn make a bread nice and fluffy, rather than dense and heavy. The first rise gets a good amount of volume going. You want to see a doubling in size during this first stage. Then you do something called ‘knocking the dough back’. Which just means you get some of the air out or shape it into the shape you want the bread to be. In this case: little balls. Simply take the dough, divide it into even parts, and roll those into little balls. That’s when we do the second rise. To get some air back into the dough, if you skip this, the bread will come out dense.

dough balls for the vegan garlic bread seen from above

Little dough balls all lined up.

Third important aspect of bread making: during the rising process, you need a warm spot free of any airflow. This because the dough needs a quiet, warm place to develop. The yeast does its work in cosy temperatures. Now, you don’t need to whack on the central heating or anything. Just find a good spot that isn’t draughty. If my flat’s cold, I like to put the dough in the oven with the little light on. The light provides enough warmth and it’s closed from any airflow.

Steam

To get bread to rise and form a crusty crust, it helps to have a bit of steam in the oven when the bread first goes in. This might mean you put an oven tray with some hot water in the bottom of your oven, maybe you have some lava rocks for the barbecue, or just a water spray you use for plants. Getting a bit of steam in when you place the bread in helps the bread rise and the crust not to set too early.

I am an advanced baker, so I have my own set up that involves lava rocks, boiling water, covering the oven. All to get that steam going. But, I understand that might not be you, so just spraying a bit of water and then quickly closing the oven will absolutely do.

For this vegan garlic tear and share bread you can decide whether you’d like a more crusty roll or a soft bread roll. If you opt for crusty, use the steaming method and a higher heat: 250C for the first 10 minutes, remove the steam and bake for 10 more at 220C.
If you decide on a softer roll, pop the bread into the oven at 220C for roughly 20 minutes, until golden brown.

a close up of the vegan garlic tear and share bread

Up close and personal.

Enjoy your vegan garlic tear and share bread! Perhaps with some White Bean Garlic Oil Dip?

a close up of the vegan garlic tear and share bread

Vegan Garlic Tear & Share Bread

4 from 1 vote
A delicious, fluffy garlic bread that's vegan and perfect for sharing. (Or just to have by yourself).
Print Recipe Pin Recipe
Prep Time 10 minutes mins
Cook Time 20 minutes mins
rising 2 hours hrs
Total Time 2 hours hrs 30 minutes mins
Servings: 10 servings
Course: Appetizer, Dinner, Lunch, Snack
Ingredients Equipment Method

Ingredients
  

  • 800 grams flour bread flour or all purpose
  • 520 grams water
  • 20 grams fresh yeast if using dry yeast: 10 grams
  • 16 grams salt
  • 1 tbsp olive oil
  • 1 tbsp dried garlic 10 grams
  • 1 tbsp thyme 10 grams
  • 2 tbsp vegan butter o margarine
  • 2 large cloves of garlic, minced 4 small cloves
  • handful fresh sage sub thyme if you don't have sage

Equipment

  • oven
  • Scale

Method
 

  1. In a bow, combine the flour, salt, water, yeast and olive oil.
  2. mix all of the ingredients. once it starts coming together knead for 5 to 8 minutes until a smooth dough.
  3. oil the bowl, cover with a damp towel and place the bowl in a warm spot in your house. in winter, i like placing it in the oven with the light on.
  4. after an hour, or once more or less doubled in size, divide into more or less equally sized balls and place next to each other on a lined baking sheet.
  5. leave for another hour.
  6. Option A: steaming method for crustier rolls. preheat the oven to 250 C (480 F) degrees. If possible with a tray of hot water in the bottom of the oven.
    place the bread in the oven. after 10 minutes, remove the hot water and reduce the heat to 220 C (440 F). Bake for 10 more minutes until golden brown.
  7. Option B: softer rolls (& easier). Bake at 220C (440F) for 20 minutes until golden brown.
  8. on a low heat, melt the butter and add the minced garlic. add the sage or thyme.
  9. pour over the bread after baking and dig in!
Tried this recipe?Let us know how it was!

Filed Under: bread, dinner, holidays, lunch, recipes, sandwiches, veganuary

White Bean Garlic Oil Dip

12/01/2021 by Amber 1 Comment

The perfect dip for any occasion has arrived: white bean garlic oil dip.

bowl of white bean chili oil dip seen from above with wooden spoon and a hand dipping a bit of flatbread in the dip and small bowl of chili oil in the top right corner

Dip anything you want.

Have you ever had one of those snacks that you just can’t stop thinking about? That is this dip with the garlic oil for me. It’s so smooth and creamy and the oil goes so well with it. You can literally dip a carrot in or a tortilla chip. Makes everything more delicious. I’d say this dip is a great party food (for when we can have parties again, yeah?).

It’s also a nice change up from hummus! It’s very similar to hummus, just made with different beans. You can blend this up with an immersion blender or a food processor. I personally tend to use the immersion blender (handheld) because it’s less of a fuss. And less of a clean up too.

a bowl of white bean chili oil dip held up close to the camera by a left hand

Perfect for any occasion.

Garlic Oil

I guarantee that once you start making your own infused oils at home you won’t go back. They are so delicious and fantastic to have around. Instead of drizzling some olive oil on a salad, you could add a bit of garlic oil. Doesn’t that sound amazing? It’s especially delightful drizzled over soup as well, for example this minestrone.

The key to making this oil is not heating up the oil too hot. We do not want to burn the garlic, we want it to slowly cook a bit. The sesame seeds add a lovely bit of crunch and look beautiful too.

Just like my hummus recipe, the secret to making a very smooth white bean dip with garlic oil is using ice cold water. So get the ice cubes ready.


bowl of white bean chili oil dip seen from above with wooden spoon and small bowl of chili oil in the top right corner

Creamy deliciousness.

Make sure you share this recipe, bookmark it, save it on Pinterest. And tag me in your photos, I love to see it!

bowl of white bean chili oil dip seen from above with wooden spoon and a hand dipping a bit of flatbread in the dip and small bowl of chili oil in the top right corner

White Bean Garlic Oil Dip

A delicious, creamy dip made with white beans (broad beans) and a homemade garlic oil top top it off.
Print Recipe Pin Recipe
Prep Time 5 minutes mins
Cook Time 15 minutes mins
Servings: 1 large bowl
Course: Appetizer, Snack
Ingredients Equipment Method Notes

Ingredients
  

Bean Dip
  • 1 jar white beans (broad beans) 400 grams
  • 4 tbsp tahini
  • 4 tbsp olive oil
  • 1 clove of garlic
  • ½ lemon
  • salt
  • pepper
  • ⅓ cup ice cold water 60 ml
Garlic Oil
  • 1 cup olive oil 250 ml
  • 4 cloves of garlic, minced
  • 1 tbsp sesame seeds
  • ½ tsp salt
  • ½ tsp paprika
  • ½ tsp chili flakes feel free to add more if you like it spicy

Equipment

  • Blender
  • Pan

Method
 

Bean Dip
  1. Rinse and drain the white beans. Add to a bowl.
  2. add the tahini, olive oil, lemon juice, salt, pepper, cold water. Blend until smooth. add a bit more water if necessary.
Garlic Oil
  1. Warm the olive oil on a low heat. Do not heat on a high heat. Mince or grate the garlic, add to the oil.
  2. Add the sesame seeds, paprika, chili flakes and salt. Let this simmer on a low heat for about 10/15 minutes.
  3. Drizzle over the bean dip. You'll have enough oil to last for a while. Drizzle on salads, soups, sandwiches, anything.
  4. Enjoy!

Notes

This keeps in the fridge for several days. 
Completely gluten free. 
Tried this recipe?Let us know how it was!

Filed Under: dips, recipes, sauces, Uncategorized, veganuary

Vegan Cheesy Hummus Pasta

12/01/2021 by Amber 2 Comments

This vegan cheesy hummus pasta is a go-to meal for me. So satisfying for lunch or dinner.

a bowl of cheesy hummus pasta held by two hands seen up close

Get ready to dig right in!

Cheesy Hummus

Let’s start with the basics here: you can either a) buy a tub of hummus or b) make your own. I recommend the latter, but also have made this with store bought hummus because hey! we’re all in a rush/feel a tad lazy sometimes. Then you’ll need nutritional yeast. I’ve also found that some types of brewer’s yeast are fine to use too! Many have been treated so the bitterness is gone. Interesting article about the types of yeast, found here.

Now, I’m not sure why this works but it does. Combine hummus with nutritional yeast and bit of cooking liquid and: cheesy flavour central. It’s creamy, umami, salty, just delicious.

pan with cheesy hummus pasta and a half a lemon seen up close with a wooden spoon

A perfect quick meal.

Kale

I really enjoy kale. In general but in particular in this dish. Look, I know kale doesn’t have a great reputation. It’s used as some sort of super foods holy grail. Sometimes it ends up in places it shouldn’t belong. (Looking at you smoothies). But hear me out, kale is actually a lovely green. It’s not a super green. It certainly won’t magically make your worries fade away. Nor make you the epitome of health. It’s just a yummy food. Sauté it with a bit of onion and garlic. Add lemon, salt, pepper, chili flakes. That way it keeps some of its texture and is just fabulous.

If you despise kale or for some reason are opposed to having any of it in your house. It’s a process, I know. All in due time. Feel free to just use spinach or cavolo nero for example. Something that cooks quickly and has a green colour. You might want to pop in a cherry tomato. That’s also fine! Make this dish the way you enjoy it. As long as you get the hummus and yeast in there, all will be well.

two bowls of cheesy hummus pasta seen from above and a pan with more pasta in the top right corner

Enough for 2 (or more).

I hope you enjoy this recipe for vegan cheesy hummus pasta.

a bowl of cheesy hummus pasta held by two hands seen up close

Vegan Cheesy Hummus Pasta

5 from 1 vote
This vegan cheesy hummus pasta is a quick, easy, and delicious meal. I like to add kale and have this on the table in 15 minutes!
Print Recipe Pin Recipe
Prep Time 5 minutes mins
Cook Time 10 minutes mins
Servings: 4 portions
Course: Dinner, Lunch, Pasta
Ingredients Equipment Method Notes

Ingredients
  

  • 500 grams penne
  • 1 onion, diced
  • 2 large cloves of garlic, minced
  • 1 tbsp olive oil
  • salt
  • pepper
  • 4 stalks kale, stems removed
  • ½ lemon
  • 1 tsp paprika (sweet or smoked)
  • 1 tsp onion powder
  • 1 tsp garlic powder
  • chili flakes
  • ½ cup pasta water 125 ml
  • 1 cup hummus 250 ml
  • ⅓ cup nutritional yeast

Equipment

  • Pan/Pot

Method
 

  1. put water on for pasta. salt properly.
  2. mince the onion and garlic. get a pan with oil on medium high heat.
  3. put the pasta in the water once boiling and set a timer if you need to.
  4. sauté the onion and garlic with a pinch of salt. once translucent, add the kale.
  5. drain the pasta and save some of the water.
  6. season the kale and onion.
  7. take off the heat and add the lemon juice, hummus, nutritional yeast.
  8. add half of the pasta water, stir and see if you'd like to add more of it/
  9. combine with the pasta and dig in!

Notes

Keeps in the fridge for several days. 
 
Gluten free if you use GF pasta!
Tried this recipe?Let us know how it was!

Filed Under: dinner, lunch, pasta, recipes, veganuary

Lentil & Spiced Sweet Potato Bowl

12/01/2021 by Amber 1 Comment

This lentil and spiced sweet potato bowl is a perfect make-ahead meal. Keep reading to grab the recipe!

a spiced lentil and sweet potato bowl held by two hands seen up close

Nourishing to both body and soul.

Nourish Bowls

I think these salad type bowls are also called nourish bowls. Basically, a bowl where you throw a bunch of nice ingredients together. You could really use anything for these. I love making these kinds of meals because you can make a lot in advance and then you don’t have to think about preparing lunch or dinner for at least a day or two. It’s versatile as well, you can pop this into a wrap too if you’d fancy. I definitely recommend making my hummus recipe to top this off.

two spiced lentil and sweet potato bowls seen from above

A great dish to meal prep too.

Sweet potato

I love a good sweet potato. They’re filling, sweet, they caramelise lovely in the oven. Paired with a plant protein like lentils you have a great base for a meal. So satisfying and full of goodness. I always think a bit of spice goes well with a sweet potato to complement the sweetness.

Combining textures is equally as important as flavours. That’s why it’s so delicious to add a bit of crunch from the nuts and the radishes. I also love something pickled or fermented. I don’t really follow any recipe when I make a fermented vegetable. Here’s one you can check out. When you have a lot of one type of vegetable, say cabbage or carrots, or even radishes or cucumber, it’s a wonderful way of preserving them. Either by pickling (takes less time) or fermenting (takes a bit more time before the tang hits).

two spiced lentil and sweet potato bowls seen from a front view with some cutlery in the background

Delicious, fresh goodness.

As for the greens, I used a mix of lettuce and spinach, mostly because that’s what I had in the fridge. I always like combining two or more types of greens, they have all of those lovely minerals in them that are good for us.

Make my lentil & spiced sweet potato bowl today.

Enjoy!

a spiced lentil and sweet potato bowl held by two hands seen up close

Lentil & Spiced Sweet Potato Bowl

A delicious, filling bowl of goodies: miso lentils, spiced sweet potato, hummus, greens and more. Takes about half an hour to make too!
Print Recipe Pin Recipe
Prep Time 5 minutes mins
Cook Time 30 minutes mins
Servings: 4 portions
Course: Dinner, Lunch, Salad
Ingredients Equipment Method Notes

Ingredients
  

  • 2 sweet potatoes, medium size
  • salt
  • pepper
  • 1 tsp onion powder
  • 1 tsp garlic powder
  • ½ tsp coriander
  • ½ tsp cumin
  • chili flakes
  • 1 tbsp olive oil
  • 1 jar lentils (400 grams)
  • 1 tbsp miso
  • 1 tbsp water
  • ½ tsp brown sugar
  • chili flakes
  • handful of lettuce
  • handful of spinach
  • ½ lemon
  • 6 radishes
  • 4 tbsp hummus
  • 4 tbsp crushed nuts

Equipment

  • oven

Method
 

  1. preheat oven to 180 C( 350 F)
  2. peel and cube the sweet potato. add the seasoning and olive oil.
  3. spread out onto a baking sheet lined with baking paper
  4. bake for 30 minutes.
  5. rinse and drain the lentils
  6. in a small bowl or cup mix the miso with water and brown sugar. add to the lentils. stir.
  7. clean lettuce and spinach as needed and add to a bowl.
  8. add the sweet potato, lentils, some radishes, a dollop of hummus, some nuts, a bit of olive oil.
  9. optional: add something fermented like kimchi, or a pickle.
  10. enjoy!

Notes

This recipe is gluten free.
Keeps in the fridge for up to a week. 
Tried this recipe?Let us know how it was!

Filed Under: dinner, lunch, recipes, veganuary

Creamiest Homemade Hummus Sandwich

11/01/2021 by Amber 2 Comments

This is the creamiest homemade hummus on a sandwich you’ll ever have. Read on to grab the recipe!

two sandwiches with hummus and a bowl of hummus in the top right corner. seen from above

Sandwiches are just the best, aren’t they?

Sandwich

Ok so first things first; sandwiches are simply one of the best food groups out there. Right? You can really put anything between two slices of bread and it’ll be delicious. Now, I’ve said it before and I’ll say it again; the quality of your bread is very important. If you can get your hands on some sourdough, please do. Otherwise, just anything with a bit of grain or texture is a good start. Personally, soft, soggy, doesn’t-really-have-any-flavour bread just does not cut it for me.

For this particular sandwich, we’re making our own hummus. (Seriously easy and so worth it!). Making some delicious aubergine slices, and topping with veggies. I also always recommend having something tangy on a sandwich. Whether that’s in the form of a store bought pickle, a homemade one, or something fermented (think kimchi or sauerkraut), it’ll elevate that sandwich.

oven tray with baked aubergine slices seen from above

Yummy aubergine for a sandwich?

Homemade hummus

A game changer for the creamiest homemade hummus is using ice cold water. Get an ice cube and pour the water you’ll be using over it. I’m not entirely sure why it works. But it does.

Aside from that, you can really use any chickpeas. Whether they’re from the shop or you cook them yourself. Hummus really is very simple to make. But oh can it go wrong. I’ve had some horrible hummus in my life. Stodgy, thick hummus, runny acidic hummus. Ew. But this simple recipe will get you there every single time. You need the fats from the tahini and the olive oil. The slight tang from the lemon. The flavour from the garlic. Salt to taste and some cracked black pepper. That’s it.

creamiest homemade hummus sandwich seen up close

The best kind of food: a sandwich

The creamiest homemade hummus sandwich is wonderful at home or to take with you! Enjoy it! Also delicious in this flatbread recipe!

creamiest homemade hummus sandwich seen up close

Creamiest Homemade Hummus Sandwich

Spiced aubergine slices on a delicious sandwich with the best and creamiest homemade hummus. This'll be your new go-to!
Print Recipe Pin Recipe
Prep Time 15 minutes mins
Cook Time 15 minutes mins
Servings: 2 big sandwiches
Course: Lunch
Ingredients Equipment Method Notes

Ingredients
  

Hummus
  • 1 tin chickpeas (400 grams)
  • 1 big clove of garlic (or 2 small)
  • ½ lemon
  • 5 tbsp tahini
  • 5 tbsp olive oil
  • 75-100 ml water (1/4-1/3 cup)
  • salt
  • pepper
Aubergine
  • 1 aubergine, sliced
  • 1 tsp smoked paprika
  • 1 tsp thyme
  • 1 tsp onion powder
  • ½ tsp coriander powder
  • 1 tbsp liquid smoke (optional)
  • 1 tbsp olive oil
  • salt
  • pepper
Sandwich
  • 4 slices of bread
  • ½ tomato
  • ½ avocado
  • hot sauce (optional)
  • something pickled (optional)

Equipment

  • oven
  • Blender/Immersion Blender

Method
 

  1. Rinse and drain the chickpeas. add to a bowl.
  2. add the garlic, pepper, salt, lemon juice.
  3. get your water with ice cube ready.
  4. add the tahini and some of the cold water. blend with blender/immersion blender/food processor.
  5. add olive oil and some more cold water. blend.
  6. taste to see if it needs more salt, pepper, maybe a splash of lemon juice more. blend until smooth and creamy. add a bit more water if you like.
  7. cut the aubergine in thin slices. add all the spices, make sure all the aubergine is covered.
  8. fry in a pan or pop in the oven at 220 C (428F) for 20 minutes. turn halfway and bake until golden brown.
  9. spread hummus on bread. add lettuce, a slice of tomato, some of the aubergine, avocado, more aubergine. optional: hot sauce and something pickled.
  10. spread hummus on the top slice of bread and enjoy!

Notes

Can be made entirely gluten free if using GF bread!
Tried this recipe?Let us know how it was!

Filed Under: lunch, recipes, sandwiches, veganuary

Roasted Chickpea Flatbreads

11/01/2021 by Amber 1 Comment

These roasted chickpea flatbreads are a perfect lazy meal. Full of flavour and little effort.

flatbread with roasted chickpeas seen from above

A perfect, quick and delicious meal!

Roasted Chickpeas

I love roasted chickpeas. They are so delicious and versatile. You can use any spices you like. Stuff them in a sandwich, salad, flatbread, the list goes on. They go lovely and crunchy. Plus chickpeas are great for protein. Which is good for you I’ve been told. All jokes aside, when you’re first going or trying vegan, it’s important to pay attention to the foods you’re eating. You don’t want to accidentally leave important nutrients out! So if you cover your bases; carbs, protein, fats, you’ll be smashing it from the get-go. The avocado in this dish is giving you fats and the bread some carbs. A fantastic meal to feel satisfied and nourished!

an oven tray with roasted chickpeas seen from above

Roasted chickpeas: lovely and versatile.

For this dish, I’m seasoning with a Mexican spice mix called Tajín. If you can find it, grab a bottle. Why? It’s citrus-y and salty and just delightful. If you can’t find any, it’s totally fine to leave this out. You could grate a bit of lime or lemon zest in with the spices, but it’s not necessary.

Lastly, I’d like to say that it’s good practice for roasted chickpeas to dry them off a bit. Simply drain them, and then take a clean tea towel and run them through it.

Flatbreads

Really you can use any type of bread container you want for these roasted chickpea flatbreads. A bread receptacle if you will. Flatbreads are very easy to make from scratch, but it does take a tiny bit more time. For the ones you see photographed, I bought naans from a place around the corner. You could also use tortillas, pitas, whatever you prefer. I did very much enjoy the pillowy softness of the naan. Any store-bought naan or tortilla is also great. Makes this meal even easier to make.

Be sure to check out my aioli recipe too to mix with the sweet chili sauce. I like using Thai sweet chili sauce.

This really is a perfect weeknight dinner or a lovely working from home lunch.

two flatbreads with roasted chickpeas, a bowl of roasted chickpeas in the bottom left corner, and garlic and coriander in the upper right corner seen from above

Bon appétit.

flatbread with roasted chickpeas seen from above

Roasted Chickpea Flatbreads

A quick and easy vegan meal with spiced oven-roasted chickpeas, avocado and sweet chili mayo!
Print Recipe Pin Recipe
Prep Time 5 minutes mins
Cook Time 30 minutes mins
Total Time 35 minutes mins
Servings: 4 flatbreads
Course: Dinner, Lunch, Main Course
Ingredients Equipment Method Notes

Ingredients
  

  • 1 tin chickpeas (400g)
  • pinch of salt
  • pepper
  • 1 tsp paprika
  • 1 tsp dried onion
  • 1 tsp Tajín (optional!
  • 1 tsp oregano
  • 1 tsp dried basil
  • 1 tbsp olive oil
  • 2 tbsp vegan mayo
  • 1 tbsp sweet chili sauce
  • 1 tomato
  • 1 avocado
  • ½ red onion
  • 4 flatbreads
  • handful of lettuce
  • fresh coriander

Equipment

  • oven

Method
 

  1. Preheat oven to 180 C (350F)
  2. rinse and dry chickpeas. add to a bowl.
  3. add the spices and oil and mix well.
  4. place on a lined baking sheet and bake for 30 minutes.
  5. combine the mayo and sweet chilli.
  6. warm up your flatbreads if you like.
  7. spread on the chili mayo, lettuce, tomato, red onion, avocado, the chickpeas, coriander.
  8. Enjoy!

Notes

Gluten free if using GF flatbreads!
Tried this recipe?Let us know how it was!

Filed Under: bread, dinner, lunch, recipes, sandwiches, veganuary

Loaded Tofu Scramble

05/01/2021 by Amber Leave a Comment

I love making this loaded tofu scramble. It’s a delicious dish to make for breakfast or brunch.

two pieces of toast with loaded tofu scramble on a wooden serving plank with cutlery in the bottom right corner and a frying pan with more of the scramble in the top right corner

The perfect late breakfast.

Tofu

There’s a lot of people out there who’ll say you need to use a specific type of tofu to make a scramble. I’m here to tell you: it doesn’t really matter all that much. I like using firm or even extra firm tofu, but that’s just my personal preference. Plus, the Asian grocer right around the corner sells it for a fantastic price. But, you can use medium soft tofu just as well. The only type of tofu I’d avoid for a scramble is silken tofu.

If you like a ‘runnier’ scramble, you could use a soft tofu. Or add a splash of plant based milk. In this loaded tofu scramble I find the vegetables give off enough liquid.

Seasoning

Really you can use any spices you like for this scramble. I love a tofu scramble that’s been seasoned well. Specifically, I love adding paprika, thyme, dried onion, garlic powder, some chilli flakes. Also completely optional for this dish: za’atar. I still have a jar of the stuff that a friend gave to me. Gosh so delicious.

Two spices that I’d say are a must: the black salt (kala namak) and turmeric. The turmeric provides a lovely colour and the black salt the eggy flavour. I believe that’s due to the sulfuric qualities of the salt.

frying pan with tofu scramble seen from above with a wooden spoon and a half a lemon in the top right corner

Get all those yummy flavours in there.

I enjoy this scramble on a piece of sourdough toast. With a spoonful of homemade aioli. Of course, you can just buy a jar of vegan mayo. This is also fabulous in a breakfast burrito. And it’s a great make ahead dish, pop it in a container and that’s an easy, protein-filled breakfast or lunch on the go!

Be sure to check out this quick recipe how-to on Instagram.

As always, save this recipe for later. Pin it on Pinterest. Share it with friends and family. And do tag me in your pictures when making my recipes!

a pan with tofu scramble in the top right corner seen from above, silver cutlery, a wooden plank with two pieces of toast with tofu scramble

Loaded Tofu Scramble

A staple for any brunch or maybe even breakfast burrito! A few vegetables, tofu, and seasoning. Ready and on the table in 15 minutes.
Print Recipe Pin Recipe
Prep Time 5 minutes mins
Cook Time 15 minutes mins
Total Time 20 minutes mins
Servings: 2 people
Course: Breakfast, Brunch, Lunch
Cuisine: Brunch
Ingredients Equipment Method Notes

Ingredients
  

  • 1 tbsp olive oil
  • 1 white onion
  • 2 cloves of garlic
  • pinch of salt
  • 1 red pepper
  • 125 grams mushrooms
  • 10 cherry tomatoes
  • 250 grams tofu
  • cracked black pepper
  • 1 tsp dried onion
  • 1 tsp dried thyme
  • 1 tsp paprika
  • 1 tsp za'atar (optional!)
  • ½ tsp turmeric
  • ½ tsp kala namak/black salt
  • ½ lemon
  • 250 grams spinach
To serve with
  • 4 slices bread (sourdough is my go-to)
  • 2 tbsp aioli or vegan mayo

Equipment

  • Pan

Method
 

  1. put a pan on a medium high heat. add the olive oil. chop up the onion and garlic.
  2. add to the pan with a pinch of salt.
  3. chop up the pepper, mushrooms, tomatoes. add the pepper and mushrooms to the pan. cook out liquid of the mushrooms and then add the tomatoes. 
  4. crumble up the tofu. add to the pan.
  5. add all the spices and lemon juice. stir well. 
  6. add in the spinach, cook down a bit. 
  7. get your toast ready with some vegan mayo or aioli and top with the scramble.
    dig in!

Notes

Make this gluten free by using GF bread! 
Tried this recipe?Let us know how it was!

Filed Under: breakfast, lunch, recipes, sandwiches, veganuary

Vegan Bourguignon & Purée

21/12/2020 by Amber 1 Comment

Here’s the holiday recipe you’ll love forever: vegan bourguignon with purée of cauliflower and potato.

vegan bourguignon in three bowl seen from above with pieces of sourdough, cutlery, and sage with a right hand holding one of the bowls

Eat right away.

Bourguignon

Bourguignon is traditionally called boeuf bourguignon and made with beef. Now, we don’t mess with beef here at oh so plantiful so here’s a vegan alternative. It’s rich, full of umami flavours, has loads of texture and just hits different. The smell of the wine, this definitely evokes the holidays. The main two subs for beef we’re using are walnuts and mushrooms. You’ll see me use that combo in loads of dishes, reason being that they truly work so well together.

Then, we’ll use a few ingredients to pack this dish full of umami richness: sun dried tomatoes, dried shiitakes (or any other dried mushroom of your choice, like porcini), tomato purée, and optional: a tablespoon of my all time favourite: Marmite. I also use Marmite in my minestrone recipe. Because we’re adding so many rich flavours, this takes away the need to use a store bought stock cube. Which I like. The last key ingredient in a good bourguignon: red wine. This could obviously be a bourguignon wine, but other red wines will do just fine! I actually use a vegan red wine that I found in Lidl, which is not only delicious but very affordable! And it’s only €3. (A Spanish wine, sorry to any Frenchies reading this).

a pot seen from above with several ingredients for the vegan bourguignon and a wooden spoon

Before adding the wine, sautéeing all the ingredients.

Lastly, make sure you make this ahead of time. The morning of the dinner or the day before. It truly does wonders to let this simmer for at least an hour or two and then let it cool down completely. That’s when all those flavours start to really mingle and get to know each other.

Cauliflower and Potato Purée

roasted cauliflower and potato and garlic in oven tray seen from above

The cauliflower and potato all roasted up.

The purée for this vegan bourguignon isn’t just any purée. We’ll be roasting the cauliflower and the potato along with cloves of garlic. This gets that nice brown colour on them and takes the purée to the next level. It also makes it very easy to prep! You can roast them whenever is best for your schedule. Then when you’re ready to start serving, sauté the onion and garlic, pop in the roasted veg, add milk and purée.

Serve right away and enjoy!

vegan bourguignon in three bowl seen from above with pieces of sourdough, cutlery, and sage with a right hand holding one of the bowls

Serve with some bread for dipping!

As always, leave me a comment if you make this. Send me your pictures on Instagram. Save this recipe and share with friends & family! Enjoy this vegan bourguignon & purée!

vegan bourguignon & purée in two bowl seen from a front view with pieces of bread and sage in the back ground

Vegan Bourguignon & Purée

A vegan version of a French classic: this vegan bourguignon is rich in flavour and texture. Served with a roasted cauliflower and potato purée.
Print Recipe Pin Recipe
Prep Time 30 minutes mins
Cook Time 2 hours hrs
Servings: 4 -6 people
Course: Dinner
Cuisine: French
Ingredients Equipment Method

Ingredients
  

Bourguignon
  • 4 tbsp olive oil
  • 2 tbsp margarine or vegan butter
  • 2 white onions
  • 6 cloves of garlic
  • 250 grams mushrooms 3 cups
  • 110 grams walnuts 1 cup
  • 2 carrots
  • 8 sun dried tomatoes
  • 8 dried shiitakes
  • 2 tbsp tomato purée
  • 1 tbsp Marmite
  • 2 tbsp flour
  • 500 ml wine 2 cups
  • 750 ml water 3 cups
  • 1 tbsp thyme
  • 1 tbsp sage
  • 3 bay leaves
Purée
  • 1 medium sized cauliflower
  • 6 potatoes
  • 4 tbsp olive oil
  • salt
  • pepper
  • 1 tsp granulated garlic
  • 12 cloves of garlic
  • 1 onion
  • 1 tbsp margarine or vegan butter
  • 375 ml plant based milk alternative, unsweetened. I use soy 1 ½ cups
  • 1 tsp nutmeg

Equipment

  • oven
  • immersion blender or food processor

Method
 

Bourguignon
  1. We’re starting with the bourguignon. Rehydrate (soak) your dried shiitakes. Get a pan on the stove, mid to high heat. Add the margerine and olive oil. Dice 2 onions and add to pan. Add pinch of salt. Mince the garlic and add.
  2. Once translucent transfer to bowl. 
  3. Cut the mushrooms and add to the pan. Cook out all the liquid (this might take 10 minutes!).
  4. Add the onion and garlic back in.
  5. Cut the carrots. Add to the pan. Stir. 
  6. In the food processor or attachment to your hand mixer, add the sun dried tomatoes. Pulse a few times until a paste. Add to pan. Stir.
  7. To the same processor, add the walnuts and pulse a few times until large crumbs. Add to the pan. Stir.
  8. In the processor again, add the rehydrated shiitakes, pulse a few times. Add to the pan. Stir. 
  9. Add the tomato purée and stir. 
  10. If opting for it, add the Marmite and stir. 
  11. Add the bay leaves, thyme, and sage. Add cracked black pepper. 
  12. Add the flour, stir well. 
  13. Add the red wine, stir.
  14. Add the water, put on a medium heat and let reduce and simmer. Let simmer for 2 hours. Cover with lid once reduced to a sauce-like consistency. 
Purée
  1. Preheat oven to 180 C (356F).
  2. Cut the cauliflower and potato in more or less even sized chunks. Add to a baking tray with 8 whole cloves of garlic (give them a whack with a knife).
  3. Add oil, salt, pepper, granulated garlic.
  4. Pop in the oven for 30 minutes. 
  5. Put a pan on the stove on mid-high heat. Add oil and margarine.
  6. Add the diced onion and 4 cloves of garlic. Sauté until translucent. 
  7. Add the roasted cauliflower and garlic. Peel the roasted garlic cloves (it should slip right out). Add those too.
  8. Add the milk and let it heat up. 
  9. Once the milk is warm, put in blender or food processor or use a hand mixer like I did. 
  10. Add salt and pepper to taste and the nutmeg. 
  11. Add to a large plate or bowl with the vegan bourguignon. Garnish with a sprig of thyme.
    Enjoy!
Tried this recipe?Let us know how it was!

Filed Under: dinner, holidays, potato, recipes

  • « Go to Previous Page
  • Page 1
  • Page 2
  • Page 3
  • Page 4
  • Go to Next Page »

Primary Sidebar

  • Facebook
  • Instagram
  • LinkedIn
  • Pinterest
  • Tumblr
  • Twitter

Newsletter

Sign up for the newsletter to stay up to date with me, get the latest recipes straight to your inbox, hear about events, cooking classes, videos, and more! Talk soon 🫶

Archives

recipe archives

  • December 2023
  • November 2023
  • January 2023
  • September 2022
  • February 2022
  • January 2022
  • January 2021
  • December 2020
  • November 2020
  • October 2020
  • September 2020
  • August 2020

Categories

outrageously delicious recipes

caramelised onion top view in pan with slice of bread

15 minute caramelised onion curry

top view of brioche buns on a baking tray

the best vegan brioche buns

spiced choc chip cookies on baking tray

spiced choc chip cookies

cast iron skillet seen from top down with spicy curried butter beans against white tablecloth backdrop

Spicy Curried Butter Beans

VEGANUARY

a cream white bowl of the creamy basil pasta seen from front view with a spoon and fork in the back

Pasta with Creamy Vegan Basil Sauce

Vegan Apple Crumble with Oats

Vegan Mushroom Tomato Ragú

MORE DELICIOUS RECIPES

One Pan BBQ-Sage Jackfruit

24/11/2020 By Amber Leave a Comment

the one pan bbq sage jackfruit fresh from the oven ready to eat with a wooden spoon in the top end and bits of sage

...

Read More

Vegan Borani Banjan

18/11/2020 By Amber Leave a Comment

vegan borani banjan seen up close front view, two white bowls, a twig of mind, a little brown bowl with lemons to the side

...

Read More

Copyright © 2025 amberitas kitchen on the Foodie Pro Theme